
I'm excited to introduce you to Ashley.
She has an amazing blog over at Ramblings and Photos.
She enters her amazing photographs into many contests and holds some of her own.
She's an all around great person and photographer!
Today she's going to share some editing tricks with you!
Thanks Ashley!
*************************************************************************
First off…Jamie thanks for having me at your blog today.
If you don’t know me, my name is Ashley Sisk and I’m the blogger and photographer behind Ramblings and Photos. When Jamie asked me if I’d write a guest post several weeks ago, I couldn’t say no...I just didn’t know what I’d write about. Then it occurred to me that I could share some newborn editing tricks to celebrate the birth of Jamie’s new baby.
Here to help me is Sarah at Loving my Life’s baby Carsyn. She sent me the picture below.
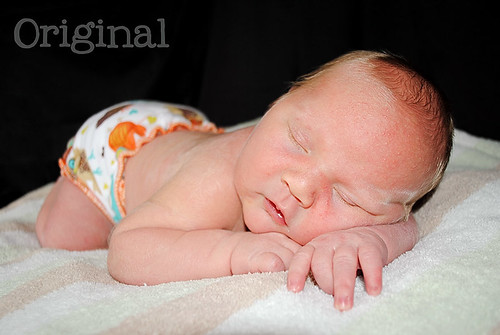
Carsyn is a beautiful baby boy, but babies are not typically born with perfect skin. Much like a teenager, newborns are born with redness and baby acne. Now, I don’t have any problem with a parent that prefers to leave their baby’s skin untouched…but some parents prefer some slight retouching for their baby portraits. For those of you that are in the later camp, I want to introduce you to Coffeeshop Photography’s Baby Powder Room action for Photoshop and Photoshop Elements.
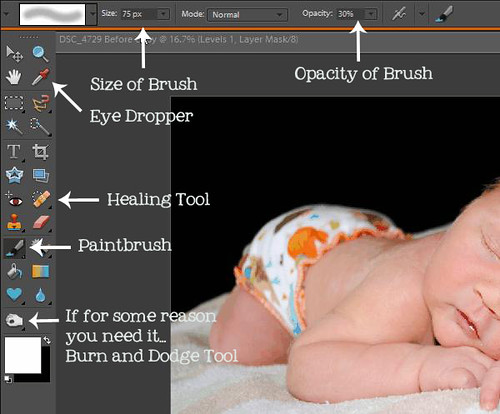
The Coffeeshop Blog offers a great and easy-to-follow tutorial along with her download, but the key to using this action starts with using a low opacity brush and then lowering your layer opacity. I personally use a 30% opacity brush to paint on the effect and will then typically lower my layer opacities below 50%. I’ve labeled the Tools in the image below that I typically use.
Once you play the action, you’ll want to use a soft white brush to paint ON effects over the black layer mask or use a soft black brush to paint OFF the effect over a white layer mask. With that said, this is the order in which I complete each step.
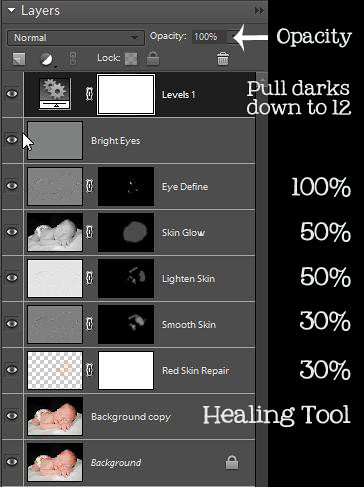
1. Create duplicate layer on top of background by clicking Ctrl J. On this layer, I use the healing tool to heal the acne around his nose and forehead.
2. On the Red Skin layer, I use the eye dropper to select an area of his skin that I want to replicate (cheeks, forehead, etc). I then use a soft white brush at 30% opacity to paint over his skin. I then lower the opacity to 30% for a natural look.
3. On the Smooth Skin layer, I use a soft white brush at 30% opacity paint over his entire face and then lower the layer opacity to 30%.
4. On the Lighten Skin layer, I use a soft white brush at 30% opacity and paint over the dark areas of his skin. I then lower that layer’s opacity to 50%.
5. On the Skin Glow layer, I use a soft white brush at 30% opacity and paint over his entire face and then lower the layer opacity to 50%.
6. On the Eye Define layer, I use a soft white brush at 30% opacity and paint over his eye lids (this is normally the layer that you’d enhance a baby’s eyes – although I typically use a different tool). Leave this layer’s opacity at 100%.
7. Ignore the bright eyes layer.
8. Create a new LEVELS adjustment layer (click on the little black/white circle in your layers section). Pull the left side to the right until it reaches 12. This will make the background completely black.
9. Merge these layers by clicking Ctrl, Shift, E.
You will get the below effect. You may choose to stop at this point.

I chose to use Amy McMaster’s Apricot Cream action plus a multiply layer at 20% as a finishing touch to this photo before resizing and sharpening.

So, did any of that make sense? I hope so…if not, feel free to ask me any questions. You can find me at:

Have a great day!

Thanks again for having me. I just blogged about it on my end so I hope a few people will swing by to visit!
Hi! Found your blog from Ashley Sisk. Congratulations on your new baby! He is just beautiful!!
Congratulations on your new baby! Great tutorial! :D
I love this action and was no kidding using it five mins before reading this post. Thanks, girls. :)
And that baby is too cute.
Marla @ www.asthefarmturns.wordpress.com
Congrats on the new baby! :)
Great tutorial, Ashley.
Jamie, I'm so glad you introducced Ashley Sisk - isn't she fabulous! I've 'known' her in blog sphere for a while and am always amazed at her talent.
Yay Ashley!! Great job! :)
What a beautiful baby boy! Great talent there, Ashley!
I could eat him up! Lovely, Ashley...and Sarah, of course! :o)
Post a Comment