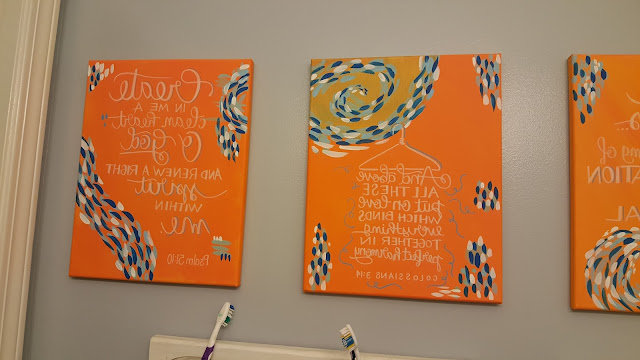
One day when I was using my kids bathroom I had a brilliant idea (because let's be honest isn't that where most brilliant ideas start?! HA!)...they have a wall only a couple of feet behind their sink and above their sink is a huge mirror. So my idea was to paint some large canvases and write some words backwards on the canvases in order for the kids to be able to read them while looking in the mirror!
They spend more time looking in the mirror in that bathroom than looking behind themselves so it just seemed logical. I got this idea about a year ago. Slowly but surely I started to make things happen.
First I wanted them to have a place off the sink to store their toothbrushes. So I got some ideas from pinterest and got to work. I got some 2x4s cut to size, bought some plumbing clamps and hooks from Lowe's and I was set for my project. I screwed the hooks and clamps to the boards and put mason jars in the clamps. I made a place for each kid to put their toothbrush and hang their towel. Then above those hooks I hung up the canvases where I wanted them to be.
Some time passed and I printed out some Bible verses backwards and just taped the paper to the canvas. I wanted to get an idea of what it would look like. More time passed and then right before Thanksgiving we decided to get a new faucet for the kids bathroom along with new hardware...the problem was, the previous homeowners had painted around the current hardware so we couldn't just replace it with our new hardware because it was different and didn't match the spaces where we took the old hardware down. Why do people do that?!! So, the Monday before Thanksgiving we spent the day painting the kids bathroom...that was not our plan for that day but it needed to be done. And we got it done.
Fast forward another few months and I got around to painting the backgrounds on all the canvases! About time right?!!
I hung them back up in the bathroom and waited until I could get more time to do the decoration part. I made time a couple of weeks ago to get these canvases done. I hate having projects in an incomplete state and this one was just dragging on too long. But the joy of them taking so long is that I was busy making custom pieces for other people!!
So, long story short I finally got the pieces finished...but I feel like I may go back over the white with paint to make the words stand out even more! So here's a small little picture tutorial on how I did the backwards canvas art!
Firs I painted the backgrounds apricot...the blue ones were for something else which I'll share tomorrow!


This is a picture of the mirror. So the canvases have a little ombre' effect because they start light and get dark...or start dark and get lighter depending on which way you're looking at them! You can also see the little toothbrush holder things that I made...and our new wall color (which is way better than the seafoam green they used to be).

I figured out my spacing by placing the paper on the canvas and then drawing out where my blue paint marks were. Then I drew on the opposite side so that my words would still fit backwards.

I then took my paper and colored all over the front of the paper where I had written the words with chalk.
Then I placed the paper chalk side down onto my canvas and traced over the letters with pencil. I used a sharpie to write on printer paper because I wanted to be able to see the words through the paper. This is a case where it's good for the pen to bleed through the paper!!!
If you were doing a regular canvas painting with words facing the correct way you can use this same technique to transfer your words. This is how I started transferring all my lettering and still do on occasion. Just color the back of the paper with chalk, place it down on the canvas and trace the words again with pencil. The chalk acts like carbon paper and leaves a chalk outline of your words (or whatever you traced with the pencil on the paper)...hope that all makes sense!
This is hard to see but it is the chalk line on the canvas!
Then I just went over the chalk with my permanent chalk marker. I love the American Crafts chalk markers and you can get them at Target (amongst other places I am sure).

Here are the mirror images all hung up...
It was a little bit challenging but very fun to write backwards!!
And here's a shot straight into the mirror!! Hi!!!
I am happy with how they turned out and glad to have it off my to-do list. Like I said earlier I may go back over the words with the marker again or paint them, but only if I have some free time...so it may never happen. But I am pleased with the results! Do you have a wall close to a mirror? I'd love to make some of these for you also!!


Post a Comment