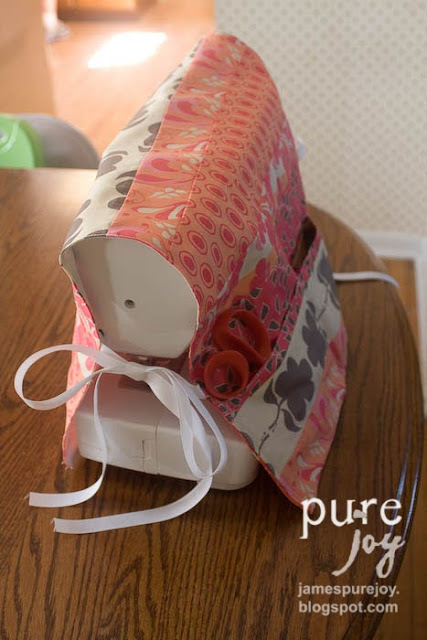
I love it when I have an idea in my head and it grows into something even better and turns out like or better than my original idea...which doesn't happen very often! So, my mother-in-law got a new sewing machine and I knew that it would be out in the open more than her older machine that was in a sewing table. So, I decided for her retirement gift to make her a sewing machine cover. I browsed pinterest for a little while and came up with an idea of how I wanted the sewing machine cover to look and how to make it work.
There's no real pattern for this sewing machine cover and I didn't really measure anything...the perfect kind of sewing to me!! I can follow a pattern I just prefer not to! So, this is a tutorial but it's really just an "idea" of how it was done, no strict rules or measurements to follow. So, if that's not your cup of tea feel free to carry on with your day.
As I was browsing pinterest I not only noticed the sewing machine covers but also some sewing mats. These are mats that are placed under the machine to either protect the table and or to provide a place for easy access to scissors, pins, markers or other things you need while sewing. I figured, why not combine the two and make one thing that can be a sewing machine cover and all a sewing machine mat.
So I created the "Sewing MaTching ( MAT-sheen) cover".
First thing I did was get a bunch of fat quarters and cut them into 2.5 and 3.5 inch strips.
Then I laid them out in the pattern I wanted, I made sure to make the pattern the same just alternating the 2.5 and 3.5 inch strips.
I sewed all the strips together...
Then I measured around the machine to see how long I needed the cover to be. I added a little bit of white fabric because I didn't cut enough strips and I actually was planning on the backside being all white but when you don't actually measure things don't really come out exactly as planned.

Then I put the fabric over the machine and figured out where I wanted the ties to go. So I basted the ribbon to the front side of the cover and tied them together so they wouldn't accidentally get sewed down when I was sewing around the whole cover (make sense?).
I sewed the front and the back together with wrong sides together leaving a small space for turning and then sewed that opening shut and actually did a top stitch around the whole cover. You could add even more rows of sewing and sort of quilt the cover if you'd like!
Then I "measured" again how long the cover would be and folded up a part from the bottom and just sewed the ends shut and added a few more lines up from the bottom to make some pockets (clear as mud hey?). Make sure to back-stitch at the tops of the pockets to keep them from coming undone.
So what do you think of the "sewing maTching cover"?
I think I should trademark that!! I really need to make one for myself...my sewing machine cover is plain and plastic!
So it looks great on your machine...
holding the essentials...scissors, measuring tape, pencil, pins, etc.
And it looks great UNDER your sewing machine keeping your tools handy!
Next time I'll just cut more strips and make it all strips on the front and back...thus making it a reversible "sewing maTching cover"!
Did that make any sense at all? Probably not. Leave me any comments if you have questions and I'll try to clarify!! Thanks for stopping by!!
Linking up at:


Post a Comment